So this is what the crank case cover looks like when taken off. The stator is the bunch of coils on the left where I have a blue arrow and circle pointing to the dead winding. You can also see the path of the wire through the (note it appears upside down relative to how it sits on the bike)

then I have the coil taken out, you can more clearly see the charring of the insulation around the wire windings.

Then on the frame there is the connector to which the stator plugs into. This essentially goes directly to the regulator (which is on the other side of the bike). An important test is to also check that the three wires that come from the stator into that plug do not connect to ground. That was the give away for my situation.

You can see that heaps of body paneling has to be removed to get at all of this. You can see the magnet that spins generating the voltage in the coils. I've covered it all under gladwrap (clingwrap?) to protect it all from dust and dirt while I waited (2 weeks) for the parts. Because the cooling system has to come off as well as the crank case cover it becomes a messy exersize.
With the new stator fitted and it all cleaned up ready to go back together.

You can see also in the top right of the above image the place where the water pump protrudes into the crank case. This is driven off a gear inside the engine too. So that's all of it. From here it all goes back together and the cooling system put on and the pannels and blah blah blah.
for the benefit of anyone doing this (and to explain why I was considering issues with the oil view window and oil filling here are some pictures of the crank case cover with the stator in place.
* stator on the right
* view window just below it
and you can see that there is a cover inside the cover, with a bearing in the middle of it. This is also a support for the clutch.
This view is not seen on any of the PDF manuals I have seen.
when removing that cover (which you'll need to do to get the wires out for the stator you reveal the insides of this chamber.

You can see:
A) the oil filler cap entry to the engine
B) the gross particle filter
C) the drain from this into the rest of the crankcase cover area.
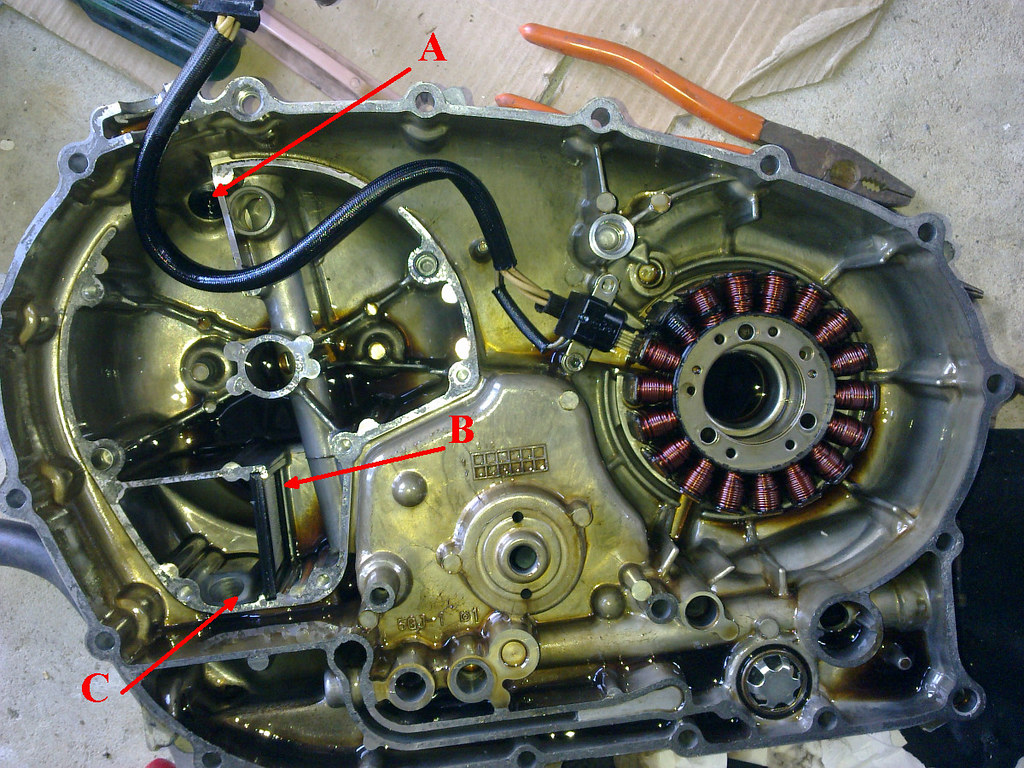
I suspected that the gross particle filter was blocked with lots of crap.
The crap came (inevitably) from cleaning off the surface before fitting the gasket again. The cover side which you see is easy to clean without hassle but the engine side is more difficult. I drained a little of the oil to discover that it was actually reasonably contaminated with bits of muck.
Note also the thin oil gallerys on the bottom part of this cover. Important to not clog them with crap when putting the gasket goo on the surfaces. So as directed, apply a thin bead ... you aren't icing a black forest cake here
All seems to be good now Oh, and the forks needed seals too...
PS
NOTE: I have had further issues with the charging system which I have gone into here.In a nutshell, there is what I believe to be a design flaw in the early model which leads to excessive draining of the battery in some situations (for many riders in warmer climates, most situations I suspect). I feel that this will have a direct influence on why the stator coils burn out - NB they are being used at their design limit all the time and overheat.
I have identified a solution for that in a post here. The solution is doable by a competent handy man or under direction any auto-electrician.


26 comments:
Unusual design! But I can see the intention might be to use the crankcase oil to cool the windings. With the (unintended?) consequence as you point out that any corrosive elements in the oil will cause trouble sooner or later!
Great article. Been racking my brains trying to figure out why my battery won't charge but this explains it. What parts did you need to order and were they expensive?
Firstly check that the regulator is not blown. Also check that there is NO continuity of circuit between any of the 3 white wires that exit the stator at the white plug.Tis will sort out if your coils are shorted or not.
Regulator was $40 on eBay and that didn't need to be replaced in my case. The stator was $500 from Yamaha (ouch)
Make sure that case gasket is perfectly clean and use silicon gasket goo on it.Te bolts will most likely not take the original torque rating anymore.
Use lock tight to prevent the threads being damaged more
Yes the official replacement parts price probably mean this is not a financially viable job with a garage. Bit daunting from the outset as a DIY job but not too difficult if you give yourself the right time and space. Interestingly my coils were burnt in the same place as yours but there was no sign of oil contamination in my case. Oil changed religiously with good stuff. I'm betting the root of this problem is corrosion in the connector on the left side of the bike. I think over time this will increase resistance and load on the stator and therefore heat on the first coil in the circuit. To avoid this problem I would consider removing this connector. Solder and tape the connections. Also keep the connector at the regulator clean. The clue for me was low resistance between the white cables and ground. This check is NOT mentioned in the service guide.
Hi
well my AC plug showed no signs of corrosion, so my experience doesn't support that theory.
That you had a bung stator at the same point is interesting. I wonder if there is something else at work here?
* consistent failing in the manufacture at that point (insulation)
* it just being out of the oil, means that no oil 'cooling' can happen on the highway
* something else causing a high power drain at this age???
I noticed also the lack of diagnostic information about checking the continuity between the coils and ground.
Like you said, if you give yourself time and space its not rocket science to do the job.
Glad you got it sorted and this post in any way helped
I've done a fair bit of research on this subject and it all points to a gradual increase in resistance over time leading to overheating of either the stator or regulator. The stator cables on the TMAX are longer than most bikes as they exit the engine on the left side and run right around the back of the bike to the regulator on the right side. This plus 2 connectors (loom and regulator) means this design is inherently at risk. Fairly sure this design weakness is the source of my issue at least. I wont be risking my repair, will ditch the left side connector and will solder the wires.
All good to know! Thanks for sharing this. I will look at this myself and consider some changes :-)
Great information.
Are any special tools needed for this ?
How much bodywork needs taking off?
Also testing the white wires, is that done whilst engine is running? Thank you
Hey Anon
no special tools needed.
rear body work needed removing, as did a little of the LHS plastics, but not the front fairing or screen.
testing the wires is done WITH THE ENGINE STOPPED. This is a continuity test, so you need a (should be cheap) volt meter with a continuity tester (should have a beeper or something too to give an audible sound. The test result you want is NO CONNECTION TO GROUND on any of these three wires. If you have connection to ground it means that the insulation of the wire windings in the stator is burnt through.
plod carefully on the disassembly and be REAL careful to clean both surfaces of the casings and gaskets
download the manual too, you'll need it.
stripped my bike today and like yours the coils are burnt on the stator.
I have changed oil regularly with Yamaha oil but this time I am going to re fill with fully synthetic.
I am on vacation next week but have ordered a new stator so will renew it on my return.
Thanks for help
Anon
worth mentioning is that you really need to clean the surfaces of the engine casings before reassembly and clean the gasket carefully too. Mine was a type of metal
I had to do it twice because it leaked the first time.
I also found that you needed to use the silicon gasket seal (I used the permatex ultra black). I found that the small bolts holding the casings together would not hold to their rated torque (and yes I have a good and accurate torque wrench). By using the silicon gasket (and some thread lock on the bolts) I was able to get sufficient seal and without risking stripping the threads in the aluminum engine casing. Doing a helicoil seemed a pain in the ass.
I believe that due to age and other factors that the threads have lost tolerance between the casing and the bolts, so this method was the best.
I've done 7000Km since the change and all is going well still.
Best of luck
I just changed the stator and now the engine will not start!
It started easy before so it must be something I have done but have no idea.
Have you any pointers what I may have done wrong. the only thing that was strange the smaller connector on the new stator would NOT fit original, so I cut off and connected it with a screw block.
Also I now have a slight water leak from the metal hose I had to remove that just push fits into the engine. PLEASE can you offer advice
?
Hi
>I just changed the stator and now the engine will not start!
won't start, or won't turn over? I had a similar problem with my motor not turning over. Turned out my stand was down :-)
>It started easy before so it must be something I have done but have no idea.
the system is the charging system. It won't effect the operation of the motor, as long as the battery is charged. The motor will run based on only the battery. Battery has charge?
> the only thing that was strange the smaller connector on the new stator would NOT fit original,
was it an original part>?
>so I cut off and connected it with a screw block.
>Also I now have a slight water leak from the metal hose I had to remove that just push fits into the engine.
did you fit new O rings? They get compressed. I cleaned the pipes carefully and used new O rings. It is possible to pinch one if you put it in improperly.
Hope that helps
Thanks
It was a copy part, so maybe that was why the connector was slightly different.
I did NOT fit new O rings, so maybe that was the trouble ;) I know what to do now.
Battery is good, I have a spark at plug. It turns over but has not even fired once.
So Nothing I have touched would or should affect the engine running just charging?
I am now completely baffled, have no idea what to do now as I say it would always fire up ok!
Hi
Is it getting fuel? Is it a fuel injection version or carbies (mine is carbies).
Its the old equation, spark or fuel.
Kill switch not off is it? Its often the simple things.
Good luck
Its a carb model 2001
I have not touched any thing fuel wise I am sure.
I know kill switch stand etc are in correct position.
I have a spark at plug
I am wondering if the stator is incorrect as the small connector would not fit. The part stated it was for the 2001 T max but I hope the small pick up part which I assume is the small connector is not causing this?
I am stuck now to be honest
Oh
I just remembered, the wires that you cut and joined, I believe that these go to the coils and are used for determining the spark timing. If you've made any mistakes there that could mean the spark happens, but at the wrong time.
just a thought
>I have not touched any thing fuel wise I am sure.
you probably haven't, but just to make sure, can you smell fuel coming into the cylinders? If you block the spark plug holes (with another plug for instance) and know that you are getting spark, but there is no fuel being sucked into the engine that'll be the problem.
I'd check that before getting worried about the other bits (and its easier to do).
if you turn the engine over a few times and pull the plugs out and it smells dry (no fuel) then perhaps that's the issue.
Its been standing for a while, it may just take some turning over to get fuel there.
Ok
Looks like no fuel??
Smells dry after turning over almost to the point of flattening the battery!
Good spark with new plugs
Is there a fuse or something for the fuel pump?
I am totally lost here now
By the way thanks for your help and support
ok
It was the white connector loose on the offsid
e of the bike hence the Fuel Pump was not working
All Ok Now
Water leak repaired, new seals
Now though it is overheating!
How do you get air out of the system or I also did not hear the fan cut in. I imagine it should?
Any ideas would be welcome please
glad to hear its all OK
have you been working to the manual?
I got my water out by the operations suggested in there. I additionally topped up coolant (do not use water) into the hose that fills the system on the front right hand side beneath the fairing there.
I added in small amounts about 1.5L with the engine running, but starting from cold.
It takes a little time for the thermostat to open and allow water flow through the engine.
Keeping the engine running will keep the water pump going and when the themostat opens the pump will circulate the water.
Leave the lid off the "over-flow" reservoir on the right hand side too (its underneath the foot board plastic cover). When you have added too much coolant into the top filler it will eventually gather in there.
When it is settled you should then make sure its between the max and min markers.
PS: glad to hear you got it sorted :-)
Hi
No I do not have a manual.
To top it up. I take it you mean the Radiator cap type Top, under front right?
I did top it up but I assume there must be an air lock. The Temp guage shot up to max after a few hundred yards! I could NOT hear any fan that I assumed should have come on? I will try topping up as you suggested tomorrow. Thanks, I just hope it is not a faulty thermostat or water pump!
>I take it you mean the Radiator cap type Top, under front right?
yes
temp shot up because there was no coolant. comment me your email (I will not publish it) and I'll send you a PDF.
don't work on the bike without it!
Hello!
Please excuse-me for my poor english, this is not my native language.
Great article! I found here a bunch of informations that I was looking for.
I'm not a mechanic but as good manual worker I think that I can do this job by myself.
But because of my possible incomprehension of the above comments, when I'll replace the stator I'll also have (or taking the opportunity of this work) to replace :
- the oil pan gasket
- the gross particle filter
- oil
- coolant
What else?
Does it exist a gasket/parts full kit for this job?
Thanks a lot in advance for your answers
Aldo
Aldo
- the oil pan gasket
not needed ... is there one?
- the gross particle filter
unless damaged, not needed to replace. It is just a bit of metal gauze ... most likely it will be fine. Mine was
These last two:
- oil
- coolant
100% certain.
My discussion with another fellow suggests that its is good to be very careful in replacing the O-rings for the water pump. Get new ones from Yamaha (mine cost $5 each and there were 3). These must be placed in situation very carefully or the tubes carrying the coolant will pinch them and they will leak.
Do you have a manual? I can show you were one can be found (for free and safely) if you send me an email. pellicle at hotmail dot com.
The main gasket is made of metal, and should be removed very carefully with a sharp blade (as from a box cutting tool) with care to not scratch the surface of the casing. This is held in place with silicon gasket seal. It must be cleaned up carefully.
I strongly suggest using this on both surfaces of the casing. The bolts holding the casing together are no quite probably longer capable of being torqued to specification. If you use the silicon gasket as I suggested above and strictly follow its directions you will be fine.
The major point is: have everything clean before re-assembly.
Then reassemble carefully and without rush. Think about it for a while before doing it.
best of luck in the job
Post a Comment